Take the lack of insulation, for example. Our house is drafty, which makes it uncomfortable and raises our heating bill significantly. While there is some insulation, it is not enough. We wanted to insulate, but this can get expensive and it would take awhile for our future energy savings to make up the cost of the project.
Yet again last year, the Lord smiled kindly on us. The federal government was offering a 30% tax credit on the cost of insulating (and other energy-efficient upgrades you do to your home) AND our wonderful power company was offering at 70% rebate on the cost of insulating (and other energy-efficient upgrade you do to your home)! Let's do the math.
70% + 30% = 100%
Yes, we will get 100% of the cost of insulating our home back. Which means that all future savings on energy go directly into our pockets! Or (more correctly) into Sallie Mae's pocket. Why would we not do this?
The catch (if it even qualifies as that) is that for the tax credit, the insulation has to be INSTALLED by the end of the year. The power company's rebate is ongoing, so they don't so much care, but we wanted the credit, so we had to move into high gear.
Yes, we should have started earlier. But we didn't. So we spent the holiday season (and Tim spent his vacation days he had to burn before the end of the year) installing this beautiful pink wall paper in the basement:

And this puffy, free-form trim:

I chose the pink wallpaper because I love pink so much. That's why I cried when I got rid of these pink blinds in my living room.

If you are learning sarcasm like Sheldon, that was sarcasm.
So here's how we did it:
Buy what you need and figure out how to get it in your basement. We would NOT recommend trying to get it in there on a very cold, windy day.
As they say in the cooking world, let it "rest." The insulation needs to be room temperature, so if it has been sitting in your (much to Tim's dismay) unheated garage, or in a lumberyard, it will need to warm up a little bit.

Meanwhile, clear everything away from the walls. I could pretend that my basement only looks like a mess because we are in the middle of a project, but let's be honest... its always a disaster.

Scrape loose, bubbly paint from the walls with a putty knife, under the close supervision of a "Friend of the Local Dog Park".

This is what it looks like.

This is what it looks like up close when someone doesn't know how to manage the manual settings on her camera.

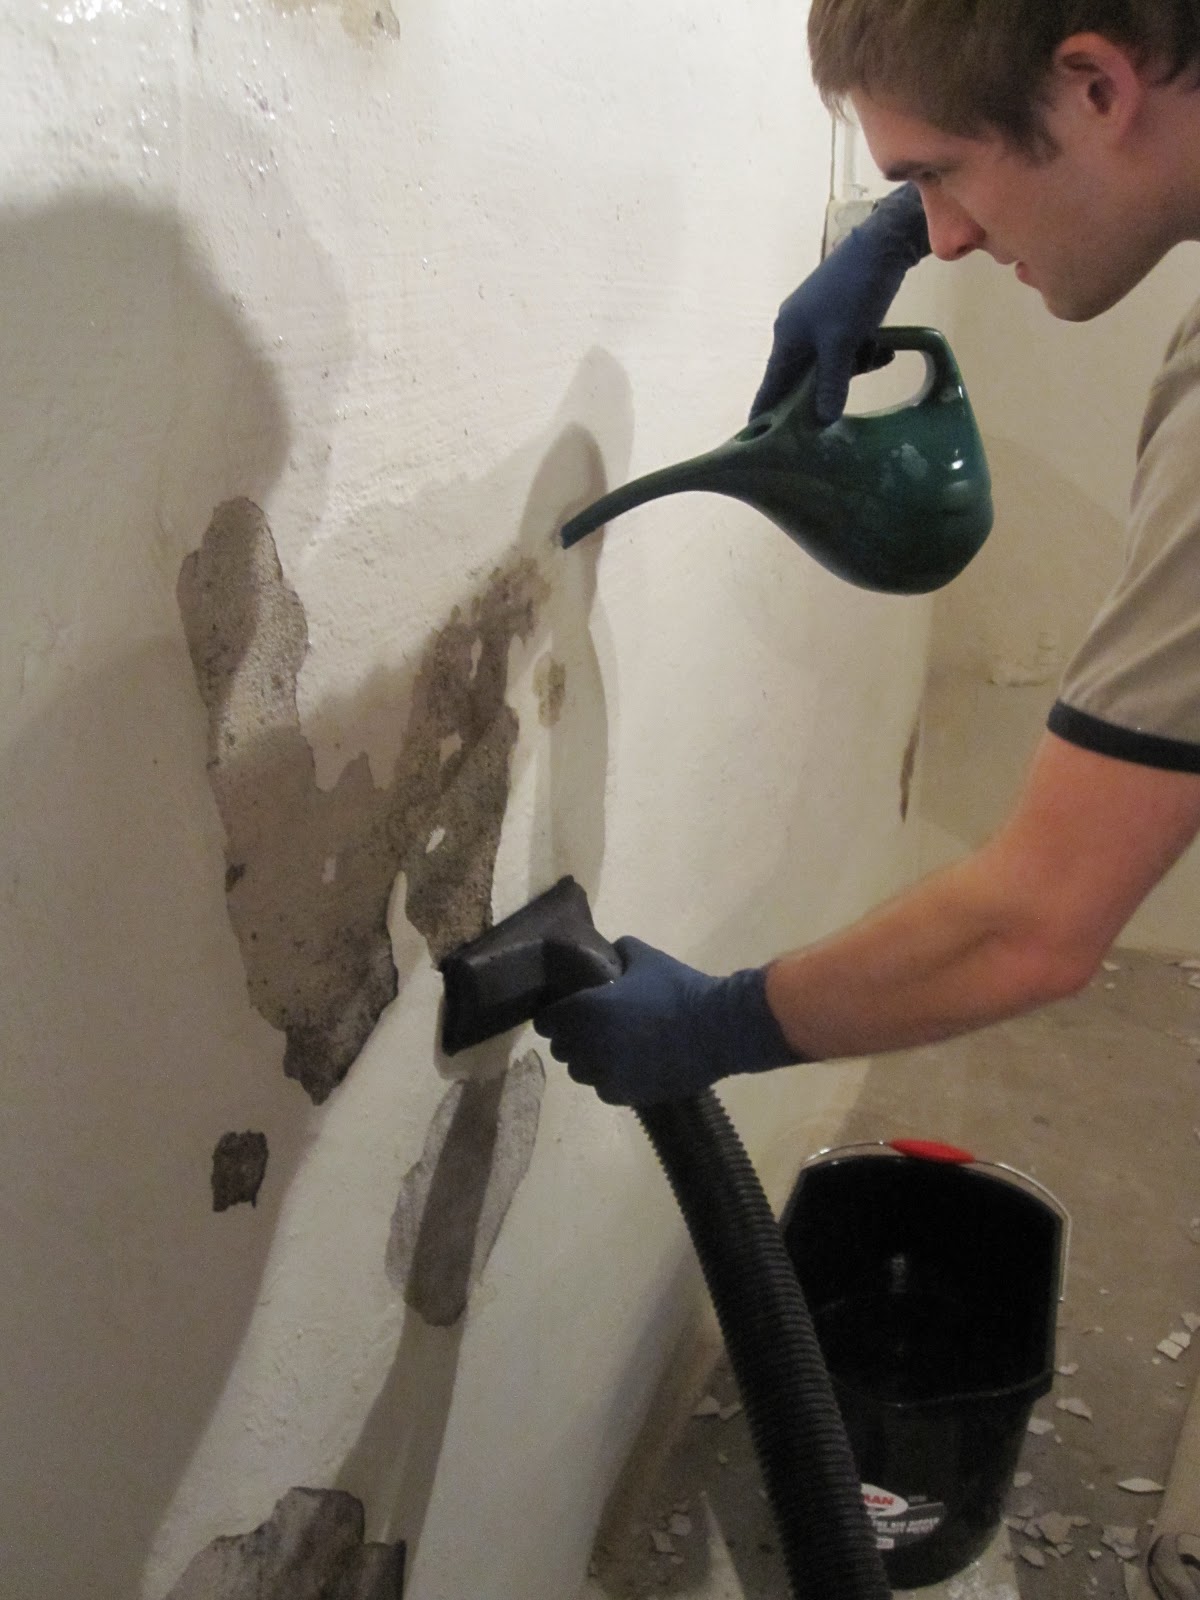
Now you need to clean these bare spots with a special cleaner and then "rinse thoroughly" according to the directions on the package. My genius engineer of a husband came up with this awesome idea for how to rinse.
Get a big bucket of water and a watering can. Empty your shop-vac of all dry materials, then set it on the wet setting. Fill the watering can with water from the bucket, turn on your shop vac, and have the attachment up on the wall, ready to catch water.

Pour water on the wall to rinse, and use the shop-vac to catch the water before it even hits the floor!! He never ceases to amaze me.

Once dry, paint the bare spots with this stuff.

Like this. (Only try to look a little happier about it.)

If your basement walls are like ours at all, they are not straight. The top is not as thick as the bottom, or something. So you need to shim.
Cut shims to fit in the space you need them, put lots of glue on, and stick em up there. Hold for a second to let the glue tack.

FINALLY, its time to insulate. Measure where you need to cut stuff out, mark the insulation, and cut it.

Hang it on the wall. We used some supposed insulation adhesive, but once it dried, it all crumbled, It never really did anything to hold the insulation up. Tim was not happy. But the insulation stayed up.

Fill in cracks and crevices with spray-foam insulation.

You have to hold the can upside down. Allow Tim to demonstrate:

You will end up with lots of useless scraps, which will make you crazy if you hate throwing things away, and wish you were one of those people that could find a use for any piece of junk.

Now we tape the cracks with this stuff. Its supposedly special insulation tape, but we were dubious and wondered if it was just red packing tape that they called insulation tape and charged more for it. We may never know, but we kind of didn't care, since all of this stuff was going to be reimbursed one way or another.

Doesn't it look like a Valentine?

So that's how we insulated the basement! You may be able to tell which steps I was more helpful with since there were fewer pictures.
We also blew insulation into our attic! Here's a brief (not helpful at all) tutorial on how to do that.
Buy lots of insulation and put in on your front porch.


Rent this big, heavy machine that almost kills you as you lift it out of the pick-up bed and lug it up your front steps to the porch.

I was too busy helping from here, so I drew these pictures to explain the process.


Ok, so I didn't draw the pictures... they were on the packaging. But they sum it up really well! And don't those people look just like us?
So there you have it. Our basement definitely feels warmer. We are interested to see how much our energy bill drops.
Thanks for taking the time to read this novel!
Buy what you need and figure out how to get it in your basement. We would NOT recommend trying to get it in there on a very cold, windy day.
As they say in the cooking world, let it "rest." The insulation needs to be room temperature, so if it has been sitting in your (much to Tim's dismay) unheated garage, or in a lumberyard, it will need to warm up a little bit.

Meanwhile, clear everything away from the walls. I could pretend that my basement only looks like a mess because we are in the middle of a project, but let's be honest... its always a disaster.

Scrape loose, bubbly paint from the walls with a putty knife, under the close supervision of a "Friend of the Local Dog Park".

This is what it looks like.

This is what it looks like up close when someone doesn't know how to manage the manual settings on her camera.

Now you need to clean these bare spots with a special cleaner and then "rinse thoroughly" according to the directions on the package. My genius engineer of a husband came up with this awesome idea for how to rinse.
Get a big bucket of water and a watering can. Empty your shop-vac of all dry materials, then set it on the wet setting. Fill the watering can with water from the bucket, turn on your shop vac, and have the attachment up on the wall, ready to catch water.

Pour water on the wall to rinse, and use the shop-vac to catch the water before it even hits the floor!! He never ceases to amaze me.
This system kind of reminds me of those things they use at the dentist when they are rinsing your teeth and try to suck the water up as they go.
Little known fact about me: I actually LOVE going to the dentist.
Once dry, paint the bare spots with this stuff.

Like this. (Only try to look a little happier about it.)

If your basement walls are like ours at all, they are not straight. The top is not as thick as the bottom, or something. So you need to shim.
Cut shims to fit in the space you need them, put lots of glue on, and stick em up there. Hold for a second to let the glue tack.

FINALLY, its time to insulate. Measure where you need to cut stuff out, mark the insulation, and cut it.

Hang it on the wall. We used some supposed insulation adhesive, but once it dried, it all crumbled, It never really did anything to hold the insulation up. Tim was not happy. But the insulation stayed up.

Fill in cracks and crevices with spray-foam insulation.

You have to hold the can upside down. Allow Tim to demonstrate:

You will end up with lots of useless scraps, which will make you crazy if you hate throwing things away, and wish you were one of those people that could find a use for any piece of junk.

Now we tape the cracks with this stuff. Its supposedly special insulation tape, but we were dubious and wondered if it was just red packing tape that they called insulation tape and charged more for it. We may never know, but we kind of didn't care, since all of this stuff was going to be reimbursed one way or another.

Doesn't it look like a Valentine?

So that's how we insulated the basement! You may be able to tell which steps I was more helpful with since there were fewer pictures.
We also blew insulation into our attic! Here's a brief (not helpful at all) tutorial on how to do that.
Buy lots of insulation and put in on your front porch.


Rent this big, heavy machine that almost kills you as you lift it out of the pick-up bed and lug it up your front steps to the porch.

I was too busy helping from here, so I drew these pictures to explain the process.


Ok, so I didn't draw the pictures... they were on the packaging. But they sum it up really well! And don't those people look just like us?
So there you have it. Our basement definitely feels warmer. We are interested to see how much our energy bill drops.
Thanks for taking the time to read this novel!
Ah extra pink stuff! The perfect material for building a large model train layout!
ReplyDeleteGenius indeed!! Well done kids!
ReplyDelete