Tim recently got some new "toys" from his grandfather this summer, and the back tires on the focus were COMPLETELY bald-- as in, threads showing--so we gave the equipment a test drive.
For those of you who have never done this, I am about to explain how to put new tires on your car. Get excited!
1. ) Jack up the car and remove the wheels. I apologize there are no pictures for this step, but it's pretty self-explanatory, right?
2.) Place the wheel on this thingymabob. I think it's called a tire mounter.
3.) It is probably best to start this process before your tires look like this. Don't worry... only two of my tires were this bad.
Ooo look, fresh new tires!
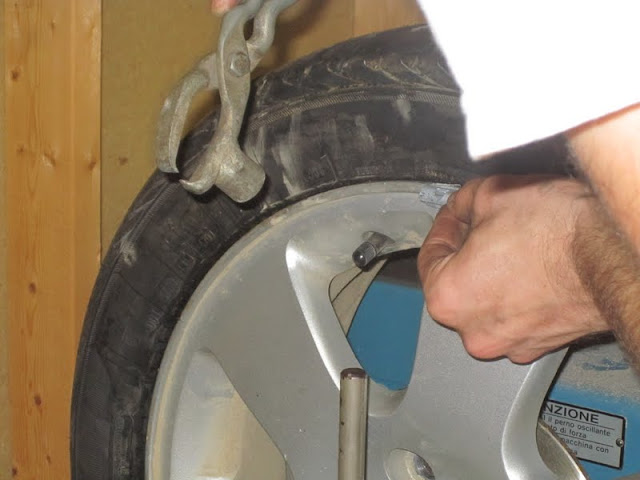
4.) Remove the valve cover.
5.) Then use a tool on the air compressor to remove the pressure releaser/ valve. Don't lose this! And don't lose the cap! You will need them later.
There it is, stripped naked.
6.) Put the giant red nut on the axle to keep the wheel from flying off.
7.) Now put the clamp on the tire.
8.) Press the pedal...
9.)... and watch as it doesn't work like you thought.
Hmm, not much happening here.
10.)
11.) Cover your ears because the tire mounter make a lot of noise, and then the air compressor kicks in (do not worry... it's supposed to do this). Laugh at Tico as he hides underneath the jacked-up car.
Look! Something's happening!
The tire is separating from the rest of the wheel! THE SEAL HAS BROKEN!
Meanwhile, on the other side of the tire, this other gadget breaks the beading on the other side.
Note: There is a lot of air being pushed out of the tire right now and it STINKS! If you have a weak stomach for nasty smells, you might not want to be around right now.
12.) It is very important to liberally apply lubricant at this stage. (That's what she said.)
What do you use? Blue Kool-Aid, of course. Ok, actually it's bug juice.
Notice how this bottle of Dawn is almost empty? Where do you think it all went?
13.) Insert the wrench/ lever between the tire and the wheel. Hook it up to the axle so that it turns with the axle.
14.) Now this part is hard to explain without you actually seeing it happen, but it is SO COOL!! You push the pedal down again, which turns the axle, which turns the lever all the way around the tire and lifts it off of the wheel. So through the magic of the interwebz... TADA! Good job, Tim!
15.) Then you do the same thing for the other side of the tire.
Whoops... how did that get in there?
Naked wheel, ready for a nice, new tire.
16.) LUBRICATE!
17.) Wrench/Lever/Arm thingy on the axle to push the tire around the wheel...
Bada-bam...
...bada-boom.
18.) Now, this is where things get really tricky. We have to get that second lip inside the wheel.
Lots and lots of lubrication is key.
You need two of these lever/ arm things, lots of brute force, and we ended up needing two people, so I couldn't take pictures.
Finally! But, notice how it's on there kind of loosy-goosy? We need to seal the beading.
19.) So you just fill it with air until you hear some loud pops, which is the sealing sound.
See how much better that looks?
Nice, tight seal.
Old, bald tires, and small, sassy dog.
So after you have acquired the appropriate tire-pressure and replaced the valve and cap that you did not lose between step 4 and step 19, you need to balance your tires.
20.) Mount it on the tire-balancing machine, alike so:
21.) Put the giant wing-nut on it to hold it in place (so it doesn't go flying off when you spin it)
22.) And fire up the machine. First you set it to balance one side. Notice on the display the red light on the outside of the tire? That's because that is the side we are balancing.
23.) See how that meter is lit up, and the tire is not spinning? That's because the part of the tire that is on top is the part that is out of balance, and what the meter is telling you is how much weight to add to that particular part of the tire.
See? And we put it on the outside, because that is the side we are balancing.
24.) Add the weight as prescribed by the machine.
One final note on balancing the tires: if you didn't have brand-new tires, you would need to make sure to remove all of the weights that are already on the tire before running the machine. It simplifies the process considerably.
So there you have it... an easy step-by-step tutorial on how to change your tires!
Disclaimer: I am not a certified car mechanic, and I haven't even had training in running these machines. I probably wasn't even using the right words. I am simply the wife of an (highly skilled) amateur that was doing this in his own garage at his own risk. Thank you and goodnight.


You make Grandfather proud!! And Stephanie I am sooooo impressed!! Hanging out in the garage with your man is taking my 'pre-marital advice' to heart. I am so thankful my son chose you for his wife! You are the best:D I LOVE YOU!! And Tim if you read this....treat your wife extra special after spending the day in the garage with you;) She's a treasure. Make sure she knows that! Love you both:D Mom Taylor
ReplyDelete